Thursday, March 25, 2010

Kitchen Project Underway - Appliances Arrive

It's been a back and forth with the appliance delivery. The online tracking said they would arrive on Wednesday, March 17th but when we called, they said that was the day they'd get to the warehouse in Atlanta and that they'd be delivered Thursday, March 25th. Tuesday, March 23rd the delivery company called to say they were coming Tuesday, March 30th. Today at 5:30 we got a call saying the truck was on its way. In the middle of a rainstorm. Oh well, we weren't complaining! It was great to get them finally.

(here's the space we cleared to put the boxes:)

(here's the truck that brought the boxes:)

(and here they all are in the kitchen:)

Going around clockwise, in the front left is the double oven, above that the range hood, way in the back the microwave, then the dishwasher and in front on right the gas cooktop. I put the green painting drop cloth down to keep the water off the floor. some of the boxes were pretty wet!

To see what they'll look like out of the boxes, check out this post from Jan 31st.

Coming next - hoping to have some cabinet installation on Monday and Tuesday. Cross your fingers!

Sunday, March 14, 2010

Memo Boards, Magnetic Boards, Cork Boards...

Because our new refrigerator is stainless steel, it's not magnetic and therefore will not be home to the many and varied items that arrive on our doorstep. From party invites to school calendars, postcards to baby announcements, there are just some things you want to be able to see and share. So my plan is to make/build/create a bulletin board in the back hallway that is our pantry/utility room/laundry room (also soon to have a fourth purpose as the mud room/shoe storage area). I want it to be big and it would be great if it was part cork and part magnetic. To this end I've been looking for inspiration. Here are some of the favorites I've found:

House and Home magazine has a fun DIY video on upgrading an office supply store cork board with paint, trim and ribbon. Watch it here. (Wish it was embeddable!) Here's a sample:

Centsational Girl had a great post Friday on building a custom bulletin board - and she built both a fabric one and a magnetic one: 

Both of these sources are great ones as they have really specific instructions about the tools and supplies you need and step-by-step instructions so you could truly "do it yourself." I love the row of hooks Centsational Girl added below her fabric board and how she customized it to the space available. And I love the use of ribbon in both examples. 

Here are my favorite bulletin board inspiration pics from houzz.com:

Window Treatments

After looking at more pictures, I think we are back to roman shades for the 3 windows in the kitchen and powder room. The shades we looked at Friday were too slouchy (see them here)- the ones in the slideshow below are much crisper. Now to pick the fabric! What do you think about stripes?

Saturday, March 13, 2010

Previewing the Cabinets - Part 4

We only have 2 sections left to talk about - the island and the part with the fridge and double ovens. I haven't drawn out my version of the latter, and the computer rendering is not great, since the space is so oddly shaped and non-standard so it may take a few days to get the last in this series of 5 posted. But today we have the island:


The computer rendering above is not quite to scale - the island is 6 feet across with the 36 inch cooktop centered on this "front" side. My picture doesn't include the hood but it's also 36 inches wide. This will be our main prep area so I'm hoping it's possible to have storage for cutting boards, spices, oils, and vinegars. The pots and pans will live in the big cabinet directly under the cook top. The drawers above that cabinet are not real - they'll hide all the inside guts of the cooktop.

The pull out for the trash will also include a recycle bin.

Friday, March 12, 2010

Kitchen Project Lighting and Fabrics


B and I had such a great time shopping today for the kitchen. First we went to Tallahassee Lighting, Fan & Blinds to look at light fixtures and options for recessed lighting. Wow there are tons of interesting lights out there (see for example the pineapple light at left). It was fun (and a little overwhelming) to see all the choices.

One of the cool things we learned about are LED recessed lights. Cree makes 6" "cans" that use almost no energy, create no heat and last for 50,000 hours! How amazing (and green) is that? Check them out at http://www.creeledlighting.com/LR6.htm

Here are some of the styles I liked for above the kitchen table:
  

The second one was MUCH prettier in real life - it didn't photograph well at all. The third one is the current favorite. It is a bit elongated with 6 cylindrical glass shades - two on each longer side and 1 on each end. Here is a picture from the manufacturer:


It's from the Hendrik collection by Kichler.

After the lighting victories, we went to 
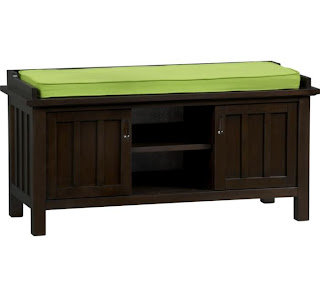
Chrysalis Fabrics which was even more fun! We picked out some fabrics we really like. We have 3 projects that need fabric: Roman shades for 3 windows - 2 in the kitchen, the 3rd in the powder room; a cushion for the mudroom bench in the pantry/utility room/laundry room; and I'd like to recover my 5 folding lyre chairs.

Here are the favorites:

(The top one for Roman shades, lower one for cushion. The top is really cute when you can see the whole pattern - it has ferns and butterflies - everything is in shades of blue and green.)

(The top for cushion, middle for lyre chair seats, bottom for Roman shades.)

(Another possibility for the Roman shades... I like the red highlight in it but don't think that's enough to make it "the favorite.")

(And this pic is to see how my 3 favorites look together... not bad!)

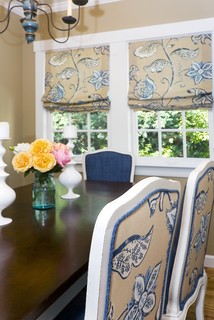
This photo from Houzz shows what I picture the Roman shades looking like (shape and style more than the actual fabric):
Burlingame Residence Two traditional dining room

Previewing the Cabinets - Part 3

Next we tackle the baking section. FYI, these pictures don't include the area for rolling out dough (you'll have to imagine that at a right angle to the left hand side of the cabinets.


And here's my drawing:

The top begins on the left with open book shelves. Since the lower section of counter will be 28 inches deep, it would be hard to get into a cabinet up in that corner, hence the shelves. Cabinets on the rest of the top, surrounding the microwave. 

On the bottom left, under the desktop there'll be a hidden cupboard for things we don't use all the time, next to that cabinets and finally 2 small under counter refrigerators - one for beer (which we need to get) and the other for wine (which we already have). The counter will run the whole length including over the little fridges.

Previewing the Cabinets - Part 2

For Part 2 of the cabinets preview, we'll look at the section with the sink. It's not drawn in this picture but it'll live to the right of the dishwasher.

And this is my version of the same picture
This is more of a think-aloud process - mostly deciding where we should have drawers vs. doors, and I think in most cases on the base cabinets we'll go for drawers. Not sure what I'm thinking with the single glass door up there... it'll probably be solid... but it would be nice to carry some of the glass door fronts from the other side to this side somehow. 

Dishes and glasses will live in the cabinets above the dishwasher. To the right of sink (in top cabinets) we'll have cereal, coffee mugs and coffee and tea supplies. The coffee pot and toaster will sit on the counter to the right of sink with bread drawer underneath as well as less used appliances.

On the left of the dishwasher, the top drawers will hold silverware and knives, with tall baking sheets in stand-up pull-out cabinets below. The other lower cabinet drawers (the blank spot there lol) will house rolls of wax paper, tin foil, etc. and small plastic storage containers (aka the tupperware).

In other news, B & I are going to look at lighting fixtures and fabric today!! Thanks B! The appliances shipped on Monday so they might be getting close to delivery now too. Yay!

Thursday, March 11, 2010

Kitchen Layout

Things are not progressing very quickly right now (at least not that we can see) so I thought before I posted more of what the different sections of cabinets will look like that I would share the layout for the whole room.
At the top of the screen is obviously the "eating side" of the kitchen. Along that top wall is the cabinetry I posted here last Saturday. Our kitchen table is in the middle there and on the left I sketched in a couple of chairs, lamps and a little table... that's just an idea... thinking about what to do there and what might fit. On the right hand side there's a window to the back yard and then the back door that leads to the breezeway.

Below that we'll have a line of cabinets, top and bottom that includes the sink and dishwasher. Continuing clockwise, we pass the door to the pantry and then have the built-in double oven and fridge. Next is the door to the formal dining room, which we use as a library and computer room.

The next section of cabinets is the baking area. The first section will be 32 inches high with no cabinets underneath, so it can be used as a desk or as a place to roll out dough (and I won't have to stand on a stool anymore!). Along the adjacent wall we'll have cabinets top and bottom for baking supplies and equipment and our wine and beer fridges.

In our clockwise tour we're to the wide door to the hall and the front entryway and then back to where we started.

In the middle of the room we'll have an island with the cooktop in it and the hood installed above. We'll have seating area with bar stools along one side. (The bar stools are the circles next to the island in the sketch.)

FYI the distances marked along the walls are in general the lengths of those full walls, not the items that sit along them.

Sunday, March 7, 2010

Houzz Comes Thru Again

Saw this photo this morning and couldn't believe how much it looks like what we are planning for our kitchen! Ignore the red accent wall... and the wall of windows... and our hood looks different but the floors, counters and cabinets are "on point" (as T's fav tv chef, Guy Fieri, loves to say).

Mid-Century Modern Kitchen modern kitchen

Kitchen Project Underway - Day 27

Here is the baseboards/shoe molding update - these went in earlier this week and make the flooring part of the project look complete.

(The entryway:)

(The end of the hallway, between the kitchen and entryway... blue tape on floor because I am still painting the trim.)

(The eating side of the kitchen. Baseboard is up on the back wall temporarily, until the cabinets are ready to be installed.)

(Close up of the shoe molding in the pantry at the bottom of the shelves.)

(Baseboards and molding behind the water heater:)

(And the back door has its trim up!)

Coming this week, more scans & plans for the cabinets!

Saturday, March 6, 2010

Previewing the Cabinets - Part 1

I'm working on scanning the preliminary drawings of our cabinets so we'll have something to amuse ourselves while they are being built. :)

This first picture is of a set that will be on the far wall. First let's see the wall where they'll live:


This is the far wall from the rest of the kitchen, on the other side of the kitchen table. It's almost 20 feet long.

The tall sections are 3 feet wide and the short section will be 3 feet high (standard counter height) and 6 feet wide. Altogether it's 12 feet long and will be centered on the wall, so we'll have about 4 feet of "white space" on either side. The short section will have a quartz counter the same as the rest of the kitchen. The whole section will be 14 inches deep. Question of the day is where should we have doors and where should we have drawers and what kinds. We are thinking glass doors for the tall cabinets here but I don't know if we want glass that close to the floor. Also do you think the size of the doors on the tall cabinets look awkward?

Update 3/11/10:
Here are three options I sketched out for the above cabinets:
My favorite is the one on the bottom right. It has glass doors on the top and drawer on each tall side to break up the wall of doors. What do you think?

Wednesday, March 3, 2010

Thinking about the Entryway

We have a little alcove in our entryway that is almost five feet across. A little bookshelf used to live there but we're thinking (or rather, Simply Southern suggested) we put something more interesting there. What do you think about a bench like this one from Crate & Barrel?

We have a mirror that hangs on the wall, above the chair rail. Here's a picture that shows the area (before we started this project):

And here's how the space looks now. It's definitely a "during" picture - the floor is done, and the baseboards are painted, but the chair rail, crowning molding and walls still await the paint. To the left is the coat closet and to the right is a little (linen?) closet in the hallway. The space is just about 5 feet wide and about 30 inches deep.

Thoughts? Ideas? 

Thanks in advance!!

Kitchen Project Underway - Day 28

(FYI I skipped day 27 - still have to take photos of the rest of the baseboards and shoe molding that is now pretty much all installed... coming soon)

Today our new fridge arrived! Here's the truck:

Here's the fridge in the house (still in the box):

Out of the box it looks good:

but oh, no there's a surprise...

The top is dented! (Those little white spots are styrofoam from the packing.) We talked to the vendor about whether we should return it, and finally decided to keep it... after getting a 20% refund and a promise: "we are guaranteeing that the unit you received will work in perfect condition." 


The top and sides will be completely enclosed by cabinets so the damage won't be visible.

Here's how it looks from the front, after all the wrappings are off and the stainless steel is shined up:

So a little bit of a stressful day, but alls well that ends well, right?
Related Posts Plugin for WordPress, Blogger...